INDEX
Cleaning and Inspection
General Information
Identification
Lubrication
Fluid Level Check
Noise
Service Diagnosis
Service Procedures
Sure-Grip Differential
Assembly
Installation
Removal
Testing
GENERAL INFORMATION (back to CONTENTS)
CAUTION: Anytime rear axle servicing is necessary, or axle. is being rotated through use of the engine or other means, ELEVATE BOTH REAR WHEELS.
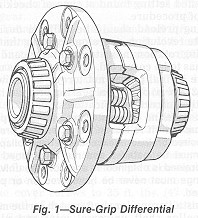
The Sure-Grip differential is being offered as a special equipment option in 8-1/4 in. rear axles (Figs. 1 and 2).
The Sure-Grip differential design is basic and simple and consists of a two piece case construction and is completely interchangeable with the conventional differential and also the previous
type.
A conventional differential allows the driving wheels to rotate at different speeds while dividing the driving torque equally between them. This function is ordinarily desirable and satisfactory. However, the total driving torque can be no more than double the torque at the
lower traction wheel. When traction conditions are not the same for both driving wheels, a portion of the available traction cannot be used.
The Sure-Grip differential allows the driving wheel with the better traction condition to develop more driving torque than the other wheel, so that the total driving torque can be significantly greater than with a conventional differential.
Sure-Grip is not a locking differential. In normal driving conditions the controlled internal friction is easily overcome during cornering and turning so that the driving wheels can turn at different speeds. Extreme differences in traction conditions at the driving wheels may permit one wheel to spin.
Sure-Grip has been engineered to perform its specialized functions with minimum effect on normal vehicle operations.
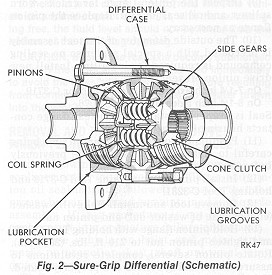
The cone clutch Sure-Grip differentials are similar to corresponding conventional differentials except for the incorporation of the helix-grooved cones that clutch the side gears to the differential case. The grooves assure maximum lubrication of the clutch surface during operation. The cones and side gears are statically spring preloaded to provide an internal resistance to differential action within the differential case itself. This internal resistance provides pulling power while under extremely low tractive conditions
such as mud, snow or ice when encountered at one of the rear wheels.
During torque application to the axle, the initial spring loading of the cones is supplemented by the gear separating forces between the side gears and differential pinions which progressively increases the friction in the differential. It should be remembered that this differential is not a positive locking type and will release before excessive driving force can be applied to one wheel.
SURE-GRIP DIFFERENTIAL IDENTIFICATION (back to CONTENTS)
Identification of Sure-Grip differential assembly can easily be made by lifting both rear wheels off the ground and turning them. If both rear wheels turn in the same direction simultaneously, the vehicle is equipped with a Sure-Grip Differential. Another means of identification is by removing the filler plug and using a flashlight to look through the filler plug hole to identify the type of differential case.
SERVICE PROCEDURES (back to CONTENTS)
SURE-GRIP DIFFERENTIAL NOISE (back to CONTENTS)
(Chatter-Moan)
Noise complaints related to rear axles equipped with cone-clutch Sure-Grip should be checked to determine the source of the noise. If a vehicle ride check produces the noise in turns but not straight ahead, the probable cause is incorrect or dissipated rear axle lubricant. The following draining and flushing procedure has been established for the
Sure-Grip Differential before it is removed from the vehicle and replaced.
CAUTION: When servicing vehicles equipped with Sure-Grip differentials do not use the engine to rotate axle components unless both rear wheels are off the ground. Sure-Grip equipped axles can exert a significant driving force if one wheel is in contact with floor and could cause the vehicle to move.
(1) With lubricant of rear axle assembly at operating temperature raise car on hoist so rear wheels are free to turn. Install jack stands.
(2) Remove axle cover and drain and discard lubricant. Rotate differential so hole in case is facing down. Wipe out all accessible areas of carrier.
The purpose of draining and discarding this lubricant is to rid the axle of any solid particles or liquid contaminants that may be contributing to the noise condition.
(3) Scrape any gasket material from housing cover and thoroughly clean surface with mineral spirits or equivalent and dry completely. Apply a 1/16 inch to 3/32 inch bead of MOPAR Silicone Rubber Sealant, Part No. 4318025 or equivalent (See Figure
7 in Conventional Axle Section of this Group) along the bolt circle of the cover.
Allow sealant to cure while cleaning carrier gasket flange with mineral spirits or equivalent. Dry surface completely. Install cover on axle and torque cover screws to 35 ft. lbs. (47
N•m). Beneath one of the cover screws, install the ratio identification tag.
If for any reason cover is not installed within 20 minutes after applying sealant, old sealant should be removed and a new bead installed.
(4) Remove jack stands. Raise or lower hoist until vehicle is in a level position.
(5) Remove filler plug. Install 4 ounces (.1183 litres) of MOPAR Hypoid Gear Oil Additive Friction Modifier, Part No. 4318060 or equivalent in the axle. Refill axle to proper level with MOPAR Hypoid Lubricant, Part No. 4318058 or equivalent.
(6) Install filler plug. Lower vehicle.
TESTING SURE-GRIP DIFFERENTIAL (back to CONTENTS)
The Sure-Grip differential can be checked to determine if its performance is satisfactory without removing the differential and carrier assembly from the vehicle.
(1) Position vehicle on a hoist with engine off and the transmission selector lever in park if automatic or in low gear if manual.
(2) Attempt to rotate wheel by applying turning force with hands gripping tire tread area.
(3) If you find it extremely difficult, if not impossible to manually turn either wheel, you can consider the
Sure-Grip differential to be performing satisfactorily. If you find it relatively easy to continuously turn either wheel the differential is not performing properly and should be removed and replaced. The
Sure-Grip Differential and internal parts are serviced as a complete assembly only.
Under no circumstances should the differential be removed and disassembled and reinstalled.
SURE-GRIP DIFFERENTIAL (back to CONTENTS)
CAUTION: During removal and installation of axle shafts, DO NOT rotate an axle shaft unless both are in position. Rotation of one axle shaft without the other in place may result in misalignment of the two spline segments with which the axle shaft spline engages, and will necessitate realignment procedures when shaft is installed.
Removal
Follow the same procedure outlined under conventional differential
removal.
Cleaning and Inspection
(back to CONTENTS)
(1) Clean the Sure-Grip differential assembly in a fast evaporating mineral spirits or a dry cleaning solvent and with exception of bearings, dry with compressed air.
(2) Inspect differential bearing cones, cups and rollers for pitting, spalling or other visible damage. If replacement is necessary, remove bearing cones from differential case using procedure outlined in conventional axle section of this group.
(3) Visually inspect differential case for cracks or other visible damage which might render it unfit for further service.
Assembly
(back to CONTENTS)
(1) If during cleaning and inspection the differential bearings were found to be unfit for further use and were removed follow procedure outlined in conventional axle section of this group.
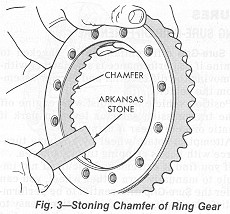
(2) On axles requiring ring gear to be installed on differential case, relieve the sharp edge of the chamfer on the inside diameter of the ring gear using an Arkansas stone (Fig.
3). This is very important, otherwise during the installation of ring gear on differential case, the sharp edge will remove metal from the pilot diameter of case, which can get imbedded between differential case flange and gear; causing ring gear not to seat properly.
(3) Heat the ring gear with a heat lamp or by immersing the gear in a hot fluid (water or oil). The temperature should not exceed 300 degrees Fahrenheit (149.0 degrees Celsius).
DO NOT USE A TORCH. It is advantageous to use pilot studs equally spaced in three positions to align the gear to the case.
(4) Using new drive gear screws (left hand threads) insert through case flange and into drive gear.
(5) Position unit between brass jaws of a vise and alternately tighten each screw to 70 ft. lbs. (95
N•m) on all axles.
(6) Follow procedure outlined in conventional axle assembly for setting drive pinion depth of mesh, drive gear backlash adjustment and bearing preload adjustment.
Installation
(back to CONTENTS)
Follow the same procedure outlined under conventional differential
installation.
LUBRICATION
(back to CONTENTS)
Multi-Purpose Gear Lubricant, as defined by the American Petroleum Institute GL-5 should be used in all rear axles with conventional differentials; MOPAR Hypoid Lubricant, Part No. 4318058 is an oil of this type and is recommended or equivalent.
In Sure-Grip Differentials 4 ounces (.1183 litres) of MOPAR Hypoid Gear Oil Additive Friction Modifier, Part No. 4318060 equivalent must be included with this fill.
Fluid Level Check
(back to CONTENTS)
For normal passenger car service, periodic fluid level checks are not required. At each engine oil change however, a fluid level check is recommended
When this check is performed with the car in a level position, supported by the suspension, the fluid level should be 1/4 inch (6.4 mm) below the filler plug opening.
When the fluid level check is made with the vehicle on a frame contact type hoist, with the axle hanging free, the fluid level should not be lower than the bottom of the filler plug opening.
CAUTION: Should the rear axle become submerged in water, the lubricant must be changed immediately to avoid the possibility of early axle failure resulting from contamination of the lubricant by water.