Setting up a differential ring & pinion
Intro
Setting up a differential is probably one of the most under-rated jobs that a mechanic can tackle.
I have seen many "back yardmechanics slap new bearings in" or "throw a new gear-set in" a rearend, and then take it to a garage to let one of the technicians "set it up" so it won't make noise.
"Setting up" a rearend, involves so much more than merely replacing parts, and installing them without any regard to the tolerances that the "parts" must be held to.
Proper setup requires patience, cleanliness, and attention to detail.
Some Terms Relating to Differentials
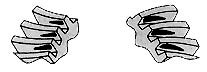
Ring & Pinion gears
The driveshaft is connected to and drives the pinion gear, which in-turn drives the ring gear at a reduced rate and at a 90 degree angle from the driveshaft.
The ring gear is basically connected to the wheels.Backlash
This is the term used to describe the "clearance" between the ring & pinion gears and is usually measured in thousandths-of-an-inch by a dial indicator.
Example: .008 - .012"Drive / Coast
The drive side of the ring gear is the side of the tooth that is contacted when the vehicle is accelerating.
The coast side is the side of the tooth on the ring gear that is contacted when the vehicle is decelerating (during engine-braking).Pattern
This refers to the tooth contact area of the gearset; In other words, Where the Ring gear and the Pinion gear "Rub" together.
Preload
The Pinion bearings and Carrier bearings run a little tight, similar to the way a wheel bearing should be "loaded".
The tapered bearings are adjusted to eliminate any play and then they are set a little tighter, making them a little "hard to turn".
This is measured by checking the torque required to turn the bearings with a dial torque wrench.
Example: 15 to 25 in.lbs.Pinion Depth
This is set with "pinion shims" and controls how the pinion contacts the ring gear in relation to the axle center.
Crush Sleeve
A piece of "pipe" that is used to hold the pinion bearings apart and offer some resistance for the pinion nut.
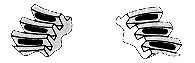
The pinion nut must be tightened down, crushing the crush sleeve, until proper pinion preload adjustment is achieved.Normal or desirable pattern:
The drive pattern should be centered on the tooth.
The coast pattern should be centered on the tooth, but may be slightly toward the toe.
There should be some clearance between the pattern and the top of the tooth.
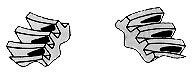
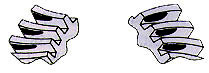
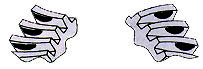
Normal or desirable pattern. The drive pattern should be centered on the tooth. The coast pattern should be centered on the tooth, but may be slightly toward the toe. There should be some clearance between the pattern and the top of the tooth. Backlash correct. Thinner pinion position shim required. Backlash correct. Thicker pinion position shim required. Pinion position shim correct. Decrease backlash. Pinion position shim correct. Increase backlash. Extra Tools Needed For Proper Differential Overhaul
Dial indicator
Ft.Lb. torque wrench
Dial In.Lb. torque wrench (0-50 In.Lb. or so)
Pullers and/or Press for removing and installing pinion and differential bearings
Spanner wrench (for many drop-out carriers)
Compressed air, and 1/2" impact wrench is helpfulDifferential Overhaul
WARNING: Gear teeth may have sharp edges. When handling gears, use care to avoid personal injury.
Before removing the differential carrier from the housing, a pattern must be taken if the original gearset is to be used again and to determine how the gearset contact has been running.
This is accomplished by painting a number of teeth on the ring gear (both the drive and the coast side) with a nondrying paint compound such as Persian Blue or equivalent gear marking compound..
Have a friend "load" the carrier by prying between the differential carrier and the rearend housing, making the pinion yoke hard to turn.
Turn the pinion yoke with a ratchet slowly and evenly, first in one direction and then the other, through the painted area of the ring gear.
This will show you where the gear teeth are touching each other.
The gearset will "wear" a pattern that may or may not be serviceable.
A desirable pattern will be at the same height (or distance from the Toe) on both the drive and the coast side, and slightly closer to the Toe than the Heal side (see photo).
If the gearset shows a pattern tending towards the "desirable pattern", the gearset may be reinstalled, but the original pattern must be adhered to.
Minor changes may be made to pinion depth and/or backlash to enhance the pattern, but only as long as the final pattern has plenty of contact surface.
If the gears are determined to be reusable, check backlash with a dial indicator and note the reading.
Consult the manual for your application and compare with recommended specifications.Mark the position of the differential bearing caps with a center punch or letter stamp set to insure proper location and orientation during reassembly.
Remove the differential carrier from the housing (it may be a tight fit due to carrier bearing preload).
Note the position of any shims and their location.
Remove the pinion nut, and tap the pinion out of the housing (protect the threads on the pinion; they can be easily ruined).
A 1/2" impact wrench is real handy for this, although you could make a tool to hold the pinion yoke, but keep in mind that the pinion nut will install with roughly 200 or 250 ft. lbs. of torque.
Remove the pinion bearing races from the rear-end housing.
Remove the carrier bearings from the differential carrier and the pinion bearings from the pinion gear.Inspect the rear-end housing closely in the area where the pinion bearing races are pressed in and where the differential bearing races are "clamped in" by the bearing caps.
Are there any signs of the races spinning or fitting loose?
How about on the bearing caps?
Check the differential carrier and the pinion gear for signs of loose fitting bearings or spinning bearings.
If the rear-end housing does not check out, a replacement should be found or the housing may be repaired by a reputable shop.
If the carrier of the pinion gear are found to be damaged, a replacement should be found.Install the bearing races into housing with any applicable pinion shims, but make sure that there are no burrs in the housing that might hold the bearing races up off of the bottom of the machined bore (sometimes burrs are made when removing the old races).
Install the bearings onto the differential carrier, and again, check for burrs on the carrier that might keep the bearing from being driven all the way on.
If the ring gear was removed, check for burrs on both mating surfaces where the ring gear contacts the differential carrier (run a flat wetstone over both surfaces to remove any burrs) and reinstall the ring gear.
Torque the ring gear bolts to specification (you need a manual here), and while your at it put some Loctite 271(RED) or 242(BLUE) on the bolts just to make sure.
Install the pinion bearing on the pinion gear and don't forget any applicable pinion shims.Install the pinion gear temporarily with the old crush sleeve (tap on the side of the crush sleeve while it is on the pinion gear to make it "longer" or "uncrushed").
Put some motor oil or gear oil on the bearings.
Install the outer pinion bearing and the pinion yoke (don't install the new pinion seal at this time).
Put some motor oil on the pinion nut and tighten down until a preload of the proper specification is achieved ( Stay on the loose side of the specifications. i.e. 15-25 inch pound spec, use 15 inch pound).
Install the differential carrier (it should also be preloaded to specification, so it will have to be tapped in), and torque the bearing caps to specifications.Check the backlash and adjust to specification if necessary.
Remember how you pattern checked the gears when you first started?
Well, now you get to do it again.
If your pattern comes out "desirable", you're almost done.
If not, consult the picture for what changes to make to your setup.
Make those changes, reinstall, pattern check, and consult the picture for what changes to make to your setup. . . . well you get the idea.
You have to have patience!
Keep at it until you are satisfied.
This is the place where most people fall short of proper setup, and blame the gear noise on a "noisy set of gears".
If the pattern looks good, then there won't be any excessive noise.
Note that all gears make an acceptable amount of noise.
Rearends, transmissions and engines all make noise.
It is up to the rubber engine, transmission, spring, and body mounts to insulate those noises from the passengers, so don't overlook these items when chasing excessive noises.After you are satisfied with the pattern, disassemble the rearend and install a new crush sleeve, and reassemble (don't forget the new pinion seal).
Reinstall the old pinion nut with motor oil and tighten until all play is eliminated in the pinion gear (but not preloaded yet).
Remove the pinion nut and clean threads on pinion gear and new pinion nut with carburetor cleaner, and install nut with Loctite 271(red) or 242(blue) and tighten down until proper pinion preload is obtained.
Install the differential carrier, and torque the differential bearing caps (it wouldn't hurt to use Loctite on the cap bolts).
Pattern check one last time (hopefully), to make sure that you reinstalled everything properly and check the backlash one last time.
If within specification, your done with the setup.Install the axles, tap the rear cover surface flat (if yours has one).
Now, if your cover is a heavy duty one with stiffening ribs, reinstall with a gasket painted with "brush-on" Aviation Permatex or equivalent and snug cover bolts moderately.
Otherwise, if your cover is flimsy (or worse, a cheap chrome one), install with no gasket and use Permatex Ultra-Black or equivalent.
If you insist on using regular silicone with a gasket (Lord knows why), go and install bath-tubs or caulking around household windows, and let somebody else work on your car!